
Toyota Axle Re-Gear/Rebuild Information & Tech
This information covers the basic process of re-gearing the Toyota Land Cruiser front and rear differentials. While the information listed is generally specific to the Land Cruiser models, the links and general overview is applicable to all of the Toyota 4x4 applications that we carry ring and pinion parts for.
Frequently Asked Questions
(FAQ):
Q: Can I do this project myself?
A: Axle re-gear projects can and have absolutely been done by the do-it-yourself home mechanic however it is a fairly in depth process and will require special tools, patience and attention to detail. Our recommendation would be that you spend some time researching the process of ring & pinion setup online and decide if its a project you are comfortable handling.
Q: What special tools are needed?
A: Dial indicator, inch-pound torque wrench, hydraulic press and related parts, bearing pullers and a Factory Service Manual (FSM) for your make & model vehicle. These are not parts offered from Cruiser Outfitters and are generally available through specialty tool manufactures and retailers.
Q: Are any modifications required to install gears into my existing differentials?
A: The majority of our axle and locker components are going to be a direct fit where at all possible. Air Locker installations will require drilling and tapping a hole in your differential housing for the bulkhead fitting. Also, all semi-float Land Cruiser 9.5" rear axles will require slight clearancing to the pinion gear for any gear ratio 4.56 & up. The installer must do minor clearancing on the teeth of the ring gear to allow the cross-shaft to slide in and out of the carrier during the c-clip installation. Gears can not be pre-clearanced as the depth of the clearancing will vary from vehicle to vehicle. As a general rule, 4.56 gears will require ~1/8" of clearancing on a single tooth. 4.88 gears will require ~ 3/16" on one or two teeth and 5.29 gears will require just over 3/16" on 2-3 teeth to allow clearance for the cross-shaft. This is not required on any front axle, rear semi-float axles only. There are no strength concerns related to any of these modifications as all have been done thousands of times during similar installs with zero adverse effects.
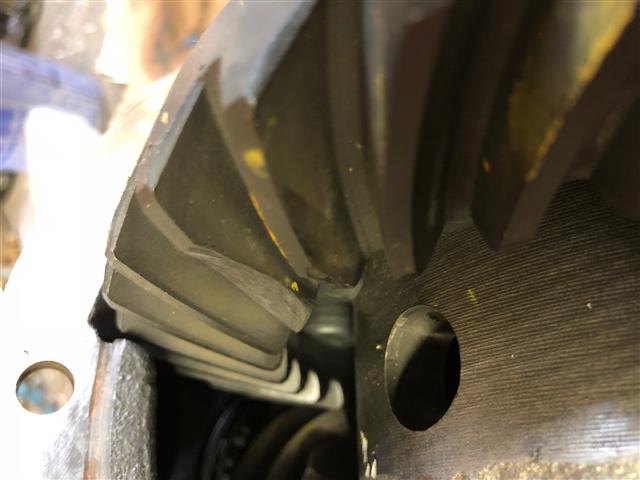
(Ring gear showing necessary clearancing for cross-shaft removal)
Q: What if I'm not comfortable doing this job myself?
A: Cruiser Outfitters can handle the project for you one of two ways. Option #1 is for you to ship us your existing 3rd members (differential assembly) that you will pull from the axle housing. We use your 3rd member cores to build differentials to your specifications and ship them back to you for installation. Option #2 is we can supply 'core' differentials to build complete drop-in 3rd members ready to insert into your housing. Pricing on complete 3rd members including the mandatory core charge is shown here:
Cruiser Outfitters Drop In Land Cruiser Differentials
Q: How do I determine which ratio gears I have now?
A: The most reliable way to determine your existing ratio is to count the number of teeth on your ring gear and divide that number by the number of teeth on your pinion gear. For example if you have 41 teeth on your ring gear and 10 on your pinion gear, you have 4.10 ratio gears (41/10 = 4.10). Alternatively, most gears are marked on the outside face of the ring gear, often shown in a ratio of the number of ring gear teeth to the number of pinion teeth, so "37/9" or "37/10", etc. These marks can be difficult to locate and in most cases require that you remove the differential from the axle housing or remove the differential cover when available. the last option which is the most difficult and least accurate is to lift one tire in the air and spin the pinion, carefully counting the number of rotations the pinion makes per complete revolution of the tire. If you spin the pinion gear approximately 3-3/4 times you likely have a 3.70 ratio, likewise if you spin it 5-1/4 times per revolution of the tire, you likely have 5.29 ratio gears. It is our recommendation that you go ahead and pull the differentials to verify all gear ratios if your not comfortable counting the rotations of the pinion and the tire.
Q: How do I determine which ratio gears I should upgrade to?
A: The recommended ratio depends on a variety of factors including your current and desired tire size, your engine and transmission combinations as well as the ways you intend to use the vehicle, be it a daily driven vehicle or a trail rig that will be transported to and from the trails on trailer. Generally, we recommend the following:
40 Series with stock 4.11 gearing: Going to a 33" tire size: 4.56-4.88, 35" tires, 4.88-5.29, 37"+ tires, 5.29 ratio ring & pinion.
60 Series with stock 3.70 gearing: Going to a 33" tire size: 4.10-4.56, 35" tires, 4.88, 37"+ tires, 5.29 ratio ring & pinion.
62 & 80 Series with stock 4.11 gearing:Going to a 33" tire size: 4.56, 35" tires, 4.88, 37"+ tires, 5.29 ratio ring & pinion.
Please keep in mind that these are just recommendations. Ideally we recommend you spend some time behind the wheel of a similarly equipped Land Cruiser to determine your personal gearing needs. Alternatively you can spend some time experimenting with some of the various online gear calculators to calculate the ideal ratio for your setup: Some of the calculators we use are shown here:
West Coast Differential Gear Calculators
4-Lo Gear Ratio & Tire Size Chart
4-Lo Gear Ratio, Tire Size & Crawl Ratio Calculators
Q: What are the parts that I will need to complete the re-gear?
A: Parts List:
1. Ring & Pinion Set (2 required, one per axle) - Cruiser Outfitters stocks a variety of ring and pinion offerings particularly the common aftermarket upgrade options for the 40/55/60/62 and 80 Series Land Cruisers. After determining your desired ring and pinion ratio you will need to order a front gear set as well as a rear gear set. The 40/55/60 and 62 applications are the same front and rear so you will need to order two identical gear sets of the same ratio. The 80 & 100 Series Land Cruisers use different gears from and rear thus you will need to be sure to choose a gear set intended for the front and one intended for the rear. All of our various ring and pinion gear set offerings are shown here:
Cruiser Outfitters Ring & Pinion Set Offerings
2. Ring & Pinion Installation Kit (2 required, one per axle) - The installation kit will include all the necessary components to fit the ring and pinion into your existing differential housing. Kits generally include two pinion bearings, two carrier bearings, the pinion nut & seal, a crush sleeve, pinion depth and preload shims, gear marking compound and a tube silicone. While it is possible to re-use your existing bearings during a re-gear or differential overhaul, its not a decision we can help you make as we don't have the differential or bearings here to inspect, for that reason we recommend you plan on a full installation kit as to replace everything at the time of install rather than chance questionable components. You can view our install kit offerings here:
Cruiser Outfitters Ring & Pinion Install Kit Offerings
3. Fine Spline Pinion Flange
- All aftermarket ring & pinions are what is commonly referred to as "fine spline" at the pinion flange. Thus if you have a pre-1980 Land Cruiser you will likely need to upgrade your 10-spline "course" flanges with the 27-splin "fine" flanges. Cruiser Outfitters stocks a full assortment of flanges to match your current or future driveline patterns. You can view our offerings here:
Cruiser Outfitters Pinion
Flange Offerings
4. Front Axle Install Components (Seals, Gaskets, etc) - As the front axle will require partial or complete disassembly to remove the differential, it is recommended that you rebuild or refresh your current axle seals, gaskets and bearings at the same time. At a minimum we recommend you replace the inner axle seals and any paper gaskets you may damage during the process such as the differential gasket. If the service history on your front axle is unknown we recommend a full knuckle rebuild kit be used to baseline your axle and replace all of the common wear components. All of our front axle components and rebuild kits are shown here:
Cruiser Outfitters Front Axle Rebuild Component Offerings
4. Rear Axle Install Components (Seals, Gaskets, etc) - Similar the the front axle, the rear axle will require partial or complete disassembly to remove the differential, it is recommended that you rebuild or refresh your current axle seals, gaskets and axle bearings at the same time. At a minimum we recommend you replace the rear axle seals and the cork differential cover gasket and the paper differential gasket. If the service history on your rear axle is unknown we recommend a full rear axle rebuild kit be used to baseline your axle and replace all of the common wear components. All of our rear axle individual components and rebuild kits are shown here:
Cruiser Outfitters Rear Axle Rebuild Component Offerings
Sample Parts List (FJ40 going to 4.56 gears):
2 - TOYLC456 - Ring & Pinion Sets
2 - IKTOYLC - R&P Install Kits
2 - PN35021 - Fine Spline Pinion Flanges
2 - DG36010 - Paper Differential Gaskets
1 - DCG35010 - Cork Differential Cover Gasket
1 - FA7590 - Front Knuckle Rebuild Kit
2 - FA33085MA - Marlin Heavy Duty Inner Axle Seals
1 - RAK7395SF - Rear Axle Rebuild Kit
Sample Parts List (FZJ80 going to 4.88 gears):
1 - TOYLC488R - Front 4.88 Ring & Pinion Set
1 - IKTOYLCF - Front R&P Install Kit
1 - TOYLC488 - Rear 4.88 Ring & Pinion Set
1 - IKTOYLCB - Rear R&P Install Kit
1 - DG36010 - Front Paper Differential Gasket
1 - DG36010 - Rear Paper Differential Gasket
1 - FA9097KWB - Front Knuckle Rebuild Kit w/Koyo Wheel Bearings
1 - RAK9397FFT - Rear Axle Kit, Full-Float w/ Timken Wheel Bearings
Q: What else do I need to
consider?
A: There are numerous variables
not discussed in this article as every re-gear is a case by case scenario however the parts list above should get you the bulk (if not all) of the components needed during the re-gear process. Consider taking a look at your steering joints, suspension, and u-joints while you are under the vehicle.
Q: What are the break-in procedures for new gear installs?
A: In order to prevent damage to differential components it is essential to follow the break-in procedure after installation of a new ring & pinion. New ring & pinions will generate more heat initially after installation and can cause gear oil to break down, leading to premature failure. On your first drive, stop after the first 15 or 20 miles and let the differential cool for 20-25 minutes before proceeding. Drive conservatively for the first 500 miles following installation (avoid hard acceleration & towing). After completing standard break-in, tow for very short distances (less than 15 miles) and let the differential cool before continuing during the first 45 towing miles. Change the gear oil after the first 500 miles. This will remove any metal particles or phosphorus coating that has come from the new ring & pinion. When doing the 500 mile fluid swap, it will be common to see the magnetic drain and fill plug's covered in a layer of the coating material and sludge. Clean the drain/fill plugs adequately before re-installing. Premature overloading/overheating will cause gear oil to breakdown, and may result in parts failure. Courtesy of Nitro Gear & Axle
*See something missing, wrong,
or incomplete? Please let us know! |


